java.lang 패키지
- java.lang 패키지의 대표적인 클래스
- Object : 모든 자바 객체의 부모 클래스
- String : 문자열
- Integer, Long, Double : 래퍼 타입, 기본형 데이터 타입을 객체로 만든 것
- Class : 클래스 메타 정보(*메타 : ~에 대한)
- System : 시스템과 관련된 기본 기능들을 제공
Object Class
1
2
3
4
5
6
7
8
| private static void action(Object obj) {
// 객체에 맞는 다운캐스팅 필요
if (obj instanceof Dog dog) {
dog.sound();
} else if (obj instanceof Car car) {
car.move();
}
}
|
- toString() : 객체의 구체적인 정보를 출력해주지 않으므로 보통 재정의(오버라이딩)하여 유용한 정보를 제공한다. 디버깅과 로깅에 유용하게 사용된다.
1
2
3
4
5
6
7
8
9
10
11
12
13
14
15
16
17
| public class Dog {
private String dogName;
private int age;
public Dog(String dogName, int age) {
this.dogName = dogName;
this.age = age;
}
@Override
public String toString() {
return "dogName = " + this.dogName + "/ age = " + this.age;
}
}
// 오버라이딩 된 인스턴스의 참조값을 확인하고 싶을 경우
Integer.toHexString(System.identityHashCode(dog));
|
메소드를 호출할 때, 하위 타입에 오버라이딩된 메소드인지 확인 후 선택하여 메소드를 호출한다.
Object 와 OCP
1
2
3
4
5
6
7
8
| public class BadObjectPrinter {
public static void print(Car car) {
System.out.println(car.carInfo());
}
public static void print(Dog dog) {
System.out.println(dog.dogInfo());
}
}
|
클래스 내 특정 객체에 대한 메서드가 존재할 경우, 해당 객체에 즉, 구체적인 것에 의존한다고 표현한다.
1
2
3
4
5
| public class ObjectPrinter {
public static void print(Object obj) {
System.out.println(obj.toString());
}
}
|
Object 클래스에 의존한다. 즉, 추상적인 것에 의존한다.
- 다형성을 잘 활용한다 == 다형적 참조와 메소드 오버라이딩을 적절하게 활용한다.
OCP원칙 : 확장에는 열려있고 코드는 수정할 필요가 없는 것을 목표로 하는 원칙
Open : 새로운 클래스를 추가하고, toString()을 오버라이딩해서 기능을 확장할 수 있다.
Closed : 새로운 클래스를 추가해도 Object와 toString()을 사용하는 클라이언트 코드인 ObjectPrinter는 변경하지 않아도 된다.
equals()
1
2
3
4
5
6
7
8
9
10
| // Object.equals()
public boolean equals(Object obj) {
return (this == obj);
}
// User.equals()
@Override
public boolean equals(Object obj) {
User user = (User) obj;
return this.id.equals(user.id);
}
|
Object.equals()는 == 으로 비교하고 있다. (* “==”는 참조 주소값 비교한다)
동등성이라는 개념은 각각의 클래스마다 다르기에 equals()도 오버라이딩을 하여 개발자가 원하는 비교를 할 수 있다.
IDE가 만들어주는 equals 활용. (Alt + Insert(generate) 로 equals() & hashCode() 오버라이딩 쉽게 가능하다)
- Object 의 나머지 메소드
- clone() : 객체를 복사한다. 잘 사용 안함.
- hashCode()
- getClass()
- notify(), notifyAll(), wait() : 멀티쓰레드용 메소드.
불변 객체(Immutable Object)
자바에서 제공하는 기본 클래스들의 대부분이 불변 객체로 이루어져 있다.
- 기본형과 참조형의 공유
- 기본형(Primitive Type) : 하나의 값을 여러 변수에 공유하지 않는다.
- 참조형(Reference Type) : 하나의 객체를 참조 주소값을 통해 여러 변수에서 공유할 수 있다.
- 공유 참조와 사이드 이펙트
1
2
3
| Address a = new Address("서울"); // 참조 주소값 공유
Address b = a;
b.setValue = "부산"; // 값을 변경할 때 사이드 이펙트 발생.
|
a와 b의 값이 부산으로 바뀐다. 참조주소값을 다른 변수에 대입하는 순간 하나의 객체를 공유하게 된다.
객체의 공유를 막을 수 없기에 이에 따른 사이드 이펙트가 생길 수 있다.
- 불변 객체 도입
객체의 내부 값, 필드가 변하지 않는 객체(공유 참조된 값을 변경하지 못하게 막는다)
객체의 복사로 인한(공유 참조 시) 사이드 이팩트를 막기 위해서 불변 객체를 사용한다. - private final String value;
- setValue()를 지워 생성자를 통해서만 값을 설정하게 했다.
- final을 필드에 설정하여 불변객체라는 의도를 명확히 표현했다.
Source Code
1
2
3
4
5
6
7
8
9
10
11
12
13
14
15
16
17
18
19
20
21
22
23
24
25
26
27
28
29
30
31
32
33
34
35
36
| public class ImmutableAddress {
private final String value;
public ImmutableAddress(String value) {
this.value = value;
}
public String getValue() {
return value;
}
@Override
public String toString() {
return "ImmutableAddress{" + "value='" + value + '\'' + '}';
}
}
public static void main(String[] args) {
ImmutableAddress address = new ImmutableAddress("서울");
MemberV1 m1 = new MemberV1("회원A", address);
MemberV2 m2 = new MemberV2("회원B", address);
System.out.println("memberA : " + m1);
System.out.println("memberB : " + m2);
// m2.getAddress().setValue("부산"); 불가능
m2.setAddress(new ImmutableAddress("부산"));
System.out.println("memberA : " + m1);
System.out.println("memberB : " + m2);
}
|
불변객체의 내부 값 변경
1
2
3
4
5
6
7
8
9
10
11
12
13
14
15
16
17
18
19
20
21
22
23
24
25
26
27
28
29
30
31
32
33
34
35
36
37
38
39
40
41
42
43
44
45
| public class ImmutableMyDate {
private final int year;
private final int month;
private final int day;
public ImmutableMyDate(int year, int month, int day) {
this.year = year;
this.month = month;
this.day = day;
}
public ImmutableMyDate withYear(int year) {
return new ImmutableMyDate(year, this.month, this.day);
}
public ImmutableMyDate withMonth(int month) {
return new ImmutableMyDate(this.year, month, this.day);
}
public ImmutableMyDate withDay(int day) {
return new ImmutableMyDate(this.year, this.month, day);
}
@Override
public String toString() {
return year + "-" + month + "-" + day;
}
}
public static void main(String[] args) {
ImmutableMyDate date1 = new ImmutableMyDate(2024, 4, 8);
ImmutableMyDate date2 = date1;
System.out.println(date1);
System.out.println(date2);
ImmutableMyDate date3 = date2.withDay(10);
System.out.println(date2);
System.out.println(date3);
}
|
String Class - 불변 객체
1
2
3
4
5
6
7
| String str = "hello";
String str = new String("hello");
String a = "hello ";
String b = "world";
String result1 = a.concat(b); // hello world
String result2 = a + b; // hello world
|
자바에서 문자열은 매우 자주 사용되므로 쌍따옴표로 문자열을 감싸면
자동으로 String str = new String(“hello”); 와 같이 변경해준다.
자바에서 원래 참조 주소값끼리 더하는 행위는 안되지만, 문자열은 너무 자주 사용되기 때문에 + 연산을 제공한다.
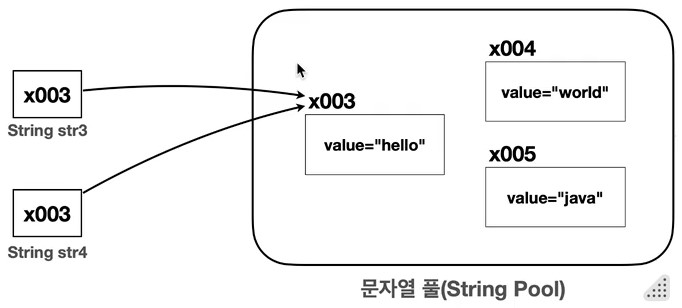
- String Pool
![]()
1
2
3
4
| String str1 = "hello";
String str2 = "hello";
System.out.println(str1 == str2); // true
System.out.println(str1.equals(str2)); // true
|
문자열 리터럴을 사용 시 메모리 효율성과 성능 최적화를 위해 문자열 풀을 사용한다.
자바 실행 시점에 클래스에 문자열 리터럴이 있으면 문자열 풀에 해당 String 인스턴스를 만들어 둔다.
이 때, 같은 문자열이 있으면 만들지 않는다.
자바 실행 -> 문자열 리터럴 확인 -> 문자열 풀에 String 인스턴스 생성
: str1과 str2는 문자열 풀에서 만들어진 인스턴스를 참조하므로 같은 참조 주소값을 가지고 있다.
- Pool : 공용 자원을 모아 놓은 곳.
- String Pool
- 힙 영역을 사용.
- 문자열 풀에서 문자열을 찾을 때, 해시 알고리즘을 사용하여 매우 빠른 속도로 원하는 String 인스턴스를 찾을 수 있다.
String은 왜 equals()를 사용해서 비교해야할까?
- String 클래스도 Object.equals()를 오버라이딩 하여 참조 주소 값이 아닌 객체 내용 자체를 비교하기 때문이다.
- 문자열은 String 인스턴스를 생성하거나 문자열 리터럴로 만들수 있다. 그러므로 문자열 비교시 어느 경로로 해당 문자열이 만들어 졌는지 알아야하는 번거로움이 있다. 따라서 문자열 비교는 항상 equals()를 사용해야 한다.
String은 왜 불변객체일까?
1
| 스트링 풀에 있는 인스턴스의 값을 중간에 변경하게 되면 해당 인스턴스를 참조하고 있는 모든 문자열들이 변하게 되기 때문에, 사이드 이펙트 문제가 발생한다.
|
String 주요 메소드
String Methods
1
2
3
4
5
6
7
8
9
10
11
12
13
14
15
16
17
18
19
20
21
22
23
24
25
26
27
28
29
| int num = 100;
boolean bool = true;
String str = "Hello, Java!";
String msg = "Hello, Java! Welcome to Java world.";
System.out.println("java".equalsIgnoreCase("JAVA")); // ture
System.out.println(" ".isBlank()); // true
System.out.println(msg.contains("world")); // true
System.out.println(msg.startsWith("world")); // false
System.out.println(msg.endsWith("world.")); // true
System.out.println(msg.indexOf("Java", 10)); // 24: 10 인덱스 이 후부터 찾는다.
System.out.println(msg.lastIndexOf("Java")); // 24
// join()
String fruits = "apple,orange,banana";
String[] split = fruits.split(",");
System.out.println(String.join("-", "a", "b", "c")); // a-b-c
System.out.println(String.join("-", split)); // apple-orange-banana
// format()
System.out.println(String.format("num : %d, bool : %b, str : %s", num, bool, str)); // num : 100, bool : true, str : Hello, Java!
System.out.println(String.format("%.2f", 10.1234)); // 10.12
// matches()
String regex = "Hello, (Java!|World)";
System.out.println(str.matches(regex)); // true
|
MethodChaining
- 메소드 체이닝
- 코드를 간결하고 읽기 쉽게 만들어준다.
- 생성한 인스턴스(자기 자시의 참조값)를 반환하기 때문에 가능하다.
1
2
3
4
5
6
7
8
9
10
11
12
13
14
15
16
17
18
| public class ValueAdder {
private int value;
public ValueAdder add(int num) {
this.value += num;
return this;
}
public int getValue() {
return value;
}
}
public static void main(String[] args) {
ValueAdder adder = new ValueAdder();
int value = adder.add(1).add(2).add(3).getValue();
System.out.println(value); // 6
}
|
StringBuilder - 가변 String
- StringBuilder
- 내부 값의 변경이 가능하여 문자열 끼리 더할 시 새로운 인스턴스를 만들 필요가 없다.
- 성능과 메모리 사용면에서 불변보다 효율적이다.
- 자바 version 9 부터는 “+” 로 문자열을 더할 때 컴파일 시 내부적으로 빌더를 사용해서 문자를 더한 후 스트링으로 반환한다. 단, 루프 안 문자열을 더하는 코드는 최적화가 이루어지지 않으니 이 때 StringBuilder 를 사용하자.
- StringBuilder를 언제 사용할까?
- 반복 횟수가 많은 루프 내 문자열을 합칠 경우
- 조건문은 통해 동적으로 문자열을 조합할 경우
- 복잡한 문자열의 특정부분을 변경해야 할 경우
- 긴문자열을 다룰 경우
1
2
3
4
5
6
7
8
9
10
11
12
13
14
15
16
17
18
19
| // StringBuilder 에서 문자열을 변경하는 대부분의 메소드도 메소드체이닝 기법을 제공하기 위해 자기 자신을 반환한다.
StringBuilder sb = new StringBuilder();
String str = sb.append("a").append("b").append("c").append("d")
.insert(4, "Java")
.delete(4, 8)
.reverse()
.toString();
System.out.println(str); // dcba
// 루프 안 StringBuilder 사용
long startTime = System.currentTimeMillis();
StringBuilder sb2 = new StringBuilder();
for (int i = 0; i < 100000; i++) {
sb2.append("java ");
}
long endTime = System.currentTimeMillis();
System.out.println(endTime-startTime);
|
- StringBuilder vs StringBuffer
- StringBuilder : 멀티쓰레드 상황에서는 안전하지 않지만 동기화 오버헤드가 없으므로 속도가 빠르다.
- StringBuffer : 내부 동기화가 되어 있어, 멀티쓰레드 상황에서 안전하지만 오버헤드로 인해 성능이 느리다.
Wrapper Class: 기본형의 객체 버전
- 기본형의 한계
- 객체가 아니기에 객체프로그래밍의 장점을 살릴 수 없다.
- 유용한 메소드 제공 x
- 객체 참조가 필요한 컬렉션 프레임워크를 사용할 수 없다.
- 제네릭 사용할 수 없다.
- null 값을 가질 수 없다.
- 래퍼클래스 특징
- 불변 객체이다.
- 객체이므로 객체 내부 값 비교시 equals()를 사용해야 한다.
- Boxing : 기본형 -> 래퍼클래스: Integer.valueOf()
- Unboxing : 래퍼클래스 -> 기본형: intValue()
- Auto-boxing / Auto-unboxing
1
2
3
4
5
6
7
8
9
10
11
12
| public static void main(String[] args) {
// Primitive -> Wrapper
int value = 7;
Integer boxedValue = value; // 오토 박싱(Auto-boxing)
// Wrapper -> Primitive
int unboxedValue = boxedValue; // 오토 언박싱(Auto-Unboxing)
System.out.println("boxedValue = " + boxedValue);
System.out.println("unboxedValue = " + unboxedValue);
}
|
1
2
3
4
5
6
7
8
9
10
11
| Integer i1 = Integer.valueOf(10);
Integer i2 = Integer.valueOf("10");
int intValue = Integer.parseInt("10");
// 비교
int compareResult = i1.compareTo(20); // -1
//산술 연산
System.out.println("sum: " + Integer.sum(10, 20));
System.out.println("min: " + Integer.min(10, 20));
System.out.println("max: " + Integer.max(10, 20));
|
Integer.parseInt() : 기본형 반환
Integer.valueOf() : 래퍼 타입 반환
기본형 연산 vs 래퍼 클래스 연산
1
2
3
4
5
6
7
8
9
10
11
12
13
14
15
16
17
18
19
20
21
22
23
24
25
| public static void main(String[] args) {
int iterations = 1_000_000_000; // 반복 횟수 설정, 10억
long startTime, endTime;
// 기본형 long 사용
long sumPrimitive = 0;
startTime = System.currentTimeMillis();
for (int i = 0; i < iterations; i++) {
sumPrimitive += i;
}
endTime = System.currentTimeMillis();
System.out.println("sumPrimitive = " + sumPrimitive);
System.out.println("기본 자료형 long 실행 시간: " + (endTime - startTime) + "ms");
// 래퍼 클래스 Long 사용
Long sumWrapper = 0L;
startTime = System.currentTimeMillis();
for (int i = 0; i < iterations; i++) {
sumWrapper += i; // 오토 박싱 발생
}
endTime = System.currentTimeMillis();
System.out.println("sumWrapper = " + sumWrapper);
System.out.println("래퍼 클래스 Long 실행 시간: " + (endTime - startTime) + "ms");
}
|
기본형 연산이 래퍼 클래스보다 대략 5배 정도 빠르다.
기본형 연산 시 보통 4바이트의 메모리를 사용하지만,
래퍼 클래스 연산 시 메타데이터를 포함하는 인스턴스를 매번 생성하여 많은 메모리를 사용한다.
- 유지보수 vs 최적화
유지보수 vs 최적화를 고려해야 하는 상황이라면 유지보수하기 좋은 코드를 먼저 고민해야 한다. 특히 최신 컴퓨터는 매 우 빠르기 때문에 메모리 상에서 발생하는 연산을 몇 번 줄인다고해도 실질적인 도움이 되지 않는 경우가 많다.
Class 클래스
- Class 클래스의 주요 기능
- 타입정보 얻기
- 리플렉션 : 클래스에 정의된 메서드, 필드, 생성자 등을 조회하고, 이들을 통해 객체 인스턴스를 생성하거나 메소드를 호출하는 작업을 할 수 있다.
- 동적 로딩과 생성 : Class.forName() 메서드를 사용하여 클래스를 동적으로 로드하고, newInstance() 메서드를 통해 새로운 인스턴스를 생성할 수 있다.
- 애노테이션 처리 : 클래스에 적용된 애노테이션(annotation)을 조회하고 처리하는 기능을 제공한다.
메타 데이터 조회
1
2
3
4
5
6
7
8
9
10
11
12
13
14
15
16
17
18
19
20
21
22
23
24
25
26
27
28
29
30
31
32
33
34
35
| public class ClassMetaMain {
public static void main(String[] args) throws Exception {
// Class 조회
Class clazz = String.class; // 1.클래스에서 조회
//Class clazz = new String().getClass();// 2.인스턴스에서 조회
//Class clazz = Class.forName("java.lang.String"); // 3.문자열로 조회
// 모든 필드 출력
Field[] fields = clazz.getDeclaredFields();
for (Field field : fields) {
System.out.println("Field: " + field.getType() + " " + field.getName());
}
// 모든 메서드 출력
Method[] methods = clazz.getDeclaredMethods();
for (Method method : methods) {
System.out.println("Method: " + method);
}
// 상위 클래스 정보 출력
System.out.println("Superclass: " + clazz.getSuperclass().getName());
// 인터페이스 정보 출력
Class[] interfaces = clazz.getInterfaces();
for (Class i : interfaces) {
System.out.println("Interface: " + i.getName());
}
}
//Class helloClass = Hello.class;
Class helloClass = Class.forName("lang.clazz.Hello");
Hello hello = (Hello) helloClass.getDeclaredConstructor().newInstance();
String result = hello.hello();
System.out.println("result = " + result);
}
|
getDeclaredConstructor().newInstance() : 생성자를 선택하여 인스턴스를 생성한다.
System 클래스
1
2
3
4
5
6
7
8
9
10
11
12
13
14
15
16
17
18
19
20
21
22
23
24
25
26
27
28
29
30
31
| public class SystemMain {
public static void main(String[] args) {
// 현재 시간(밀리초)를 가져온다.
long currentTimeMillis = System.currentTimeMillis();
System.out.println("currentTimeMillis: " + currentTimeMillis);
// 현재 시간(나노초)를 가져온다.
long currentTimeNano = System.nanoTime();
System.out.println("currentTimeNano: " + currentTimeNano);
// 환경 변수를 읽는다.
System.out.println("getenv = " + System.getenv());
// 시스템 속성을 읽는다.
System.out.println("properties = " + System.getProperties());
System.out.println("Java version: " + System.getProperty("java.version"));
// 배열을 고속으로 복사한다.
char[] originalArray = new char[]{'h', 'e', 'l', 'l', 'o'};
char[] copiedArray = new char[5];
System.arraycopy(originalArray, 0, copiedArray, 0, originalArray.length);
// 배열 출력
System.out.println("copiedArray = " + copiedArray);
System.out.println("Arrays.toString = " + Arrays.toString(copiedArray));
// 프로그램 종료
System.exit(0);
}
}
|
System.arraycopy : 배열 복사를 운영체제로 넘겨 통째로 복사한다.
Math, Random 클래스
- Math Class
- 기본 연산 메서드
- abs(x) : 절대값
- max(a, b) : 최대값
- min(a, b) : 최소값
- 지수 및 로그 연산 메서드
- exp(x) : e^x 계산
- log(x) : 자연 로그
- log10(x) : 로그 10
- pow(a, b) : a의 b 제곱
- 반올림 및 정밀도 메서드
- ceil(x) : 올림
- floor(x) : 내림
- rint(x) : 가장 가까운 정수로 반올림
- round(x) : 반올림
- 삼각 함수 메서드
- sin(x) : 사인
- cos(x) : 코사인
- tan(x) : 탄젠트
- 기타 유용한 메서드
- sqrt(x) : 제곱근
- cbrt(x) : 세제곱근
- random() : 0.0과 1.0 사이의 무작위 값 생성
- Random Class
1
2
3
4
5
6
7
8
9
10
11
12
13
14
15
16
17
18
19
20
| public class RandomMain {
public static void main(String[] args) {
Random random = new Random();
//Random random = new Random(1); // seed가 같으면 Random의 결과가 같다.
int randomInt = random.nextInt();
System.out.println("randomInt: " + randomInt);
double randomDouble = random.nextDouble(); // 0.0d ~ 1.0d
System.out.println("randomDouble: " + randomDouble);
boolean randomBoolean = random.nextBoolean();
System.out.println("randomBoolean: " + randomBoolean);
// 범위 조회
int randomRange1 = random.nextInt(10); // 0 ~ 9까지 출력
System.out.println("0 ~ 9: " + randomRange1);
int randomRange2 = random.nextInt(10) + 1; // 1 ~ 10까지 출력
System.out.println("1 ~ 10: " + randomRange2);
}
}
|
new Random() : 생성자를 비워두면 내부에서 System.nanoTime() 에 여러가지 복잡한 알고리즘을 섞어서 씨드값을 생성한다. 따라서 반복 실행해도 결과가 항상 달라진다.
씨드 값이 같으면 여러번 반복 실행해도 실행 결과가 같다.
ENUM Type
- 열거형(ENUM)의 장점
- 타입 안정성 향상: 열거형은 사전에 정의된 상수들로만 구성되므로, 유효하지 않은 값이 입력될 가능성이 없다. 이런 경우 컴파일 오류가 발생한다.
- 간결성 및 일관성: 열거형을 사용하면 코드가 더 간결하고 명확해지며, 데이터의 일관성이 보장된다.
- 확장성: 새로운 회원 등급을 타입을 추가하고 싶을 때, ENUM에 새로운 상수를 추가하기만 하면 된다.
1
2
3
4
5
6
7
8
9
10
11
12
13
14
15
16
17
|
public static void main(String[] args) {
int price = 10000;
DiscountService discountService = new DiscountService();
int basic = discountService.discount(BASIC, price);
int gold = discountService.discount(GOLD, price);
int diamond = discountService.discount(DIAMOND, price);
System.out.println("BASIC 등급의 할인 금액: " + basic);
System.out.println("GOLD 등급의 할인 금액: " + gold);
System.out.println("DIAMOND 등급의 할인 금액: " + diamond);
/** ENUM 클래스를 활용하여 매개변수에 개발자가 의도한 값만 받게 되었다. **/
}
|
- 정리
- java.lang.Enum 을 자동으로 상속 받는다.
- 열거형은 인터페이스를 구현할 수 있다.
- 열거형에 추상 메소드를 선언하고 구현할 수 있다.(익명 클래스와 같은 방식을 사용한다.)
Source Code
1
2
3
4
5
6
7
8
9
10
11
12
13
14
15
16
17
18
19
20
21
22
23
24
25
26
27
28
29
30
31
32
33
34
35
36
37
38
39
40
41
42
43
44
45
46
47
48
49
50
51
52
53
54
55
56
| public enum HttpStatus {
OK(200, "OK")
, BAD_REQUEST(400, "Bad Request")
, NOT_FOUND(404, "Not Found")
, INTERNAL_SERVER_ERROR(500, "Internal Server Error");
private final int code;
private final String message;
HttpStatus(int code, String message) {
this.code = code;
this.message = message;
}
public int getCode() {
return code;
}
public String getMessage() {
return message;
}
public static HttpStatus findByCode(int code) {
for (HttpStatus value : values()) {
if (value.getCode() == code) {
return value;
}
}
return null;
}
public boolean isSuccess() {
return code >= 200 && code <= 299;
}
}
public static void main(String[] args) {
Scanner scanner = new Scanner(System.in);
System.out.print("HTTP CODE: ");
int httpCodeInput = scanner.nextInt();
HttpStatus status = HttpStatus.findByCode(httpCodeInput);
if (status == null) {
System.out.println("정의되지 않은 코드");
} else {
System.out.println(status.getCode() + " " + status.getMessage());
System.out.println("isSuccess = " + status.isSuccess());
}
}
|
날짜와 시간
참고링크 : https://github.com/jeongkeepscalm/Java_Intermediate/tree/master/src/time/
중첩 클래스, 내부클래스
- 중첩클래스(Nested Class)
- 정적 중첩클래스(static)
- 내부 클래스(non-static)
- 정적 중첩클래스(static) : 클래스 내부에 위치해 있지만 위치해 있는 클래스와는 크게 관계가 없다.
- 내부 클래스(non-static) : 클래스 내부에 위치해 있으며 위치해 있는 클래스와 연관성이 높다.
- 중첩 클래스를 사용하는 이유
- 논리적 그룹화: 특정 클래스가 다른 하나의 클래스 안에서만 사용되는 경우 해당 클래스 안에 포함하는 것이 논리적으로 더 그룹화 된다.
- 캡슐화: 중첩 클래스는 바깥 클래스의 private 멤버에 접근할 수 있다.
=> 특정 클래스에서만 활용이 될 경우에만 중첩클래스로 만들자.
정적 중첩클래스
1
2
3
4
5
6
7
8
9
10
11
12
13
14
15
16
17
18
19
20
21
22
| public class Network {
public void sendMessage(String text) {
NetworkMessage networkMessage = new NetworkMessage(text);
networkMessage.print();
}
private static class NetworkMessage {
private String content;
public NetworkMessage(String content) {
this.content = content;
}
public void print() {
System.out.println(content);
}
}
}
|
내부 클래스
1
2
3
4
5
6
7
8
9
10
11
12
13
14
15
16
17
18
19
20
21
22
23
24
25
| public class Car {
private String model;
private int chargeLevel;
private Engine engine;
public Car(String model, int chargeLevel) {
this.model = model;
this.chargeLevel = chargeLevel;
this.engine = new Engine();
}
public void start() {
engine.start();
System.out.println(model + " 시작 완료");
}
private class Engine {
public void start() {
System.out.println("충전 레벨 확인: " + chargeLevel);
System.out.println(model + "의 엔진을 구동합니다.");
}
}
}
|
지역 클래스
1
2
3
4
5
6
7
8
9
10
11
12
13
14
15
16
17
18
19
20
21
22
23
24
25
26
27
28
29
30
31
32
| public class LocalOuterV1 {
private int a = 3;
public void process(int param) {
int b = 2;
class LocalPrinter {
int c = 1;
public void localPrint() {
System.out.println("a = " + a); // 3
System.out.println("b = " + b); // 2
System.out.println("c = " + c); // 1
System.out.println("param = " + param); // 100
}
}
LocalPrinter localPrinter = new LocalPrinter();
localPrinter.localPrint();
}
public static void main(String[] args) {
LocalOuterV1 localOuterV1 = new LocalOuterV1();
localOuterV1.process(100);
}
}
|
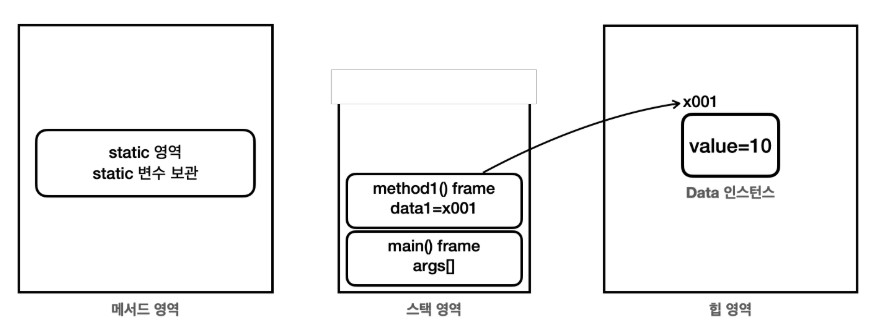
지역 클래스 - 지역 변수 캡처
![]()
변수의 생명주기
클래스 변수(static): 메서드 영역에 존재하고, 자바가 클래스 정보를 읽어 들이는 순간부터 프로그램 종료까지 존재한다.
인스턴스 변수: 힙 영역에 존재하고, 본인이 소속된 인스턴스가 GC 되기 전까지 존재한다. 생존 주기가 긴 편이다.
지역 변수: 스택 영역의 스택 프레임 안에 존재한다. 따라서 메서드가 호출 되면 생성되고, 메서드 호출이 종료되면 스택 프레임이 제거되면서 그 안에 있는 지역 변수도 모두 제거된다. 생존 주기가 아주 짧다. 참고로 매개변수도 지역 변수의 한 종류이다.
1
2
3
4
5
6
7
8
9
10
11
12
13
14
15
16
17
18
19
20
21
22
23
24
25
26
27
28
29
30
31
32
33
34
35
36
37
38
39
40
41
42
43
44
45
46
47
48
49
50
51
| public class LocalOuterV3 {
private int a = 3;
public Printer process(int param) {
int b = 2; // 지역 변수는 스택 프레임이 종료되는 순간 함께 제거된다.
// 인터페이스 구현해서 사용 가능하다.
class LocalPrinter implements Printer {
int c = 1;
@Override
public void print() {
System.out.println("a = " + a); // 3
System.out.println("b = " + b); // 2
System.out.println("c = " + c); // 1
System.out.println("param = " + param); // 100
}
}
LocalPrinter localPrinter = new LocalPrinter();
// localPrinter.print(); V3에서는 LocalPrinter 를 반환한다.
return localPrinter;
}
public static void main(String[] args) {
LocalOuterV3 localOuter = new LocalOuterV3();
Printer printer = localOuter.process(2);
//printer.print()를 나중에 실행한다. process()의 스택 프레임이 사라진 이후에 실행
printer.print();
//추가
System.out.println("필드 확인");
Field[] fields = printer.getClass().getDeclaredFields();
for (Field field : fields) {
System.out.println("field = " + field);
}
/*
field = int nested.nested.local.LocalOuterV3$1LocalPrinter.c
field = final int nested.nested.local.LocalOuterV3$1LocalPrinter.val$b
field = final int nested.nested.local.LocalOuterV3$1LocalPrinter.val$param
field = final nested.nested.local.LocalOuterV3 nested.nested.local.LocalOuterV3$1LocalPrinter.this$0
*/
}
}
|
지역 클래스로 만든 객체도 인스턴스이기 때문에 힙 영역에 존재한다. 따라서 GC 전까지 생존한다.
LocalPrinter 인스턴스는 process() 메서드 안에서 생성된다. 그리고 process() 에서 main()으로 생성한 LocalPrinter 인스턴스를 반환하고 printer 변수에 참조를 보관한다. 따라서 LocalPrinter 인스턴스는 main() 이 종료될 때 까지 생존한다.
param, b 와 같은 지역 변수는 process() 메서드를 실행하는 동안에만 스택 영역에서 생존한다. process() 메서드가 종료되면 process() 스택 프레임이 스택 영역에서 제거 되면서 함께 제거된다.
param, b 는 변경이 불가능한 사실상 final이다.
- 캡쳐변수의 값을 변경하지 못하는 이유는?
- 지역 변수의 값을 변경하면 인스턴스에 캡처한 변수의 값도 변경해야 한다.
- 반대로 인스턴스에 있는 캡처 변수의 값을 변경하면 해당 지역 변수의 값도 다시 변경해야 한다.
- 지역 변수의 값과 인스턴스에 있는 캡처 변수의 값을 서로 동기화 해야 하는데, 멀티쓰레드 상황에서 이런 동기화는 매우 어렵고, 성능에 나쁜 영향을 줄 수 있다.
자바는 캡처한 지역 변수의 값을 변하지 못하게 막아서 이런 복잡한 문제들을 근본적으로 차단한다.
=> 지역 클래스가 접근하는 지역 변수의 값은 변경하면 안된다.
익명 클래스
익명 클래스: 익명 클래스를 사용하면 클래스의 이름을 생략하고, 클래스의 선언과 생성을 한번에 처리할 수 있다.
1
2
3
4
5
6
7
8
9
10
11
12
13
14
15
16
17
18
19
20
21
22
23
24
25
26
27
28
29
30
31
32
33
| public class AnonymousOuter {
private int a = 3;
public void process(int param) {
int b = 2;
/** 익명클래스: 클래스의 선언과 생성을 한번에 처리한다. **/
Printer printer = new Printer() {
int c = 1;
@Override
public void print() {
System.out.println("a = " + a);
System.out.println("b = " + b);
System.out.println("c = " + c);
System.out.println("param = " + param);
}
};
printer.print();
}
public static void main(String[] args) {
AnonymousOuter anonymousOuter = new AnonymousOuter();
anonymousOuter.process(100);
}
}
|
- 익명클래스 특징
- 익명 클래스는 이름 없는 지역 클래스를 선언하면서 동시에 생성한다.
- 익명 클래스는 부모 클래스를 상속 받거나, 또는 인터페이스를 구현해야 한다. 익명 클래스를 사용할 때는 상위 클래스나 인터페이스가 필요하다.
- 이름을 가지지 않으므로, 생성자를 가질 수 없다. (기본 생성자만 사용됨)
- 익명 클래스는 AnonymousOuter$1 과 같이 자바 내부에서 바깥 클래스 이름 + $ + 숫자로 정의된다. 익명 클래스가 여러개면 $1 , $2 , $3 으로 숫자가 증가하면서 구분된다.
- 지역 클래스가 일회성으로 사용되는 경우나 간단한 구현을 제공할 때 사용한다.
리펙토링 전
1
2
3
4
5
6
7
8
9
10
11
12
13
14
15
16
17
18
19
20
21
22
23
| public class Ex1Main {
public static void helloDice() {
System.out.println("프로그램 시작");
int randomValue = new Random().nextInt(6) + 1;
System.out.println("주사위 = " + randomValue);
System.out.println("프로그램 종료");
}
public static void helloSum() {
System.out.println("프로그램 시작");
for (int i = 1; i <= 3; i++) {
System.out.println("i = " + i);
}
System.out.println("프로그램 종료");
}
public static void main(String[] args) {
helloDice();
helloSum();
}
}
|
리팩토링: 정적 중첩 클래스 사용
1
2
3
4
5
6
7
8
9
10
11
12
13
14
15
16
17
18
19
20
21
22
23
24
25
26
27
28
29
30
31
32
33
34
35
36
37
| public interface Process {
void run();
}
public class Ex1RefMainV1 {
public static void hello(Process process) {
System.out.println("프로그램 시작");
process.run();
System.out.println("프로그램 종료");
}
static class Dice implements Process {
@Override
public void run() {
int randomValue = new Random().nextInt(6) + 1;
System.out.println("주사위 = " + randomValue);
}
}
static class Sum implements Process {
@Override
public void run() {
for (int i = 1; i <= 3; i++) {
System.out.println("i = " + i);
}
}
}
public static void main(String[] args) {
Process dice = new Dice();
Process sum = new Sum();
System.out.println("Hello 실행");
hello(dice);
hello(sum);
}
}
|
process.run(): 다형성을 활용해서 외부에서 전달되는 인스턴스에 따라 각각 다른 코드 조각이 실행된다.
리팩토링: 익명 클래스 사용
1
2
3
4
5
6
7
8
9
10
11
12
13
14
15
16
17
18
19
20
21
22
23
24
25
26
27
28
29
| public class Ex2Main {
public static void hello(Process process) {
System.out.println("프로그램 시작");
process.run();
System.out.println("프로그램 종료");
}
public static void main(String[] args) {
Process dice = new Process() {
@Override
public void run() {
int randomValue = new Random().nextInt(6) + 1;
System.out.println("주사위 = " + randomValue);
}
};
Process sum = new Process() {
@Override
public void run() {
for (int i = 1; i <= 3; i++) {
System.out.println("i = " + i);
}
}
};
hello(dice);
hello(sum);
}
}
|
리팩토링: 익명 클래스(참조값 직접 전달)
1
2
3
4
5
6
7
8
9
10
11
12
13
14
15
16
17
18
19
20
21
22
23
24
25
26
27
| public class Ex3Main {
public static void hello(Process process) {
System.out.println("프로그램 시작");
process.run();
System.out.println("프로그램 종료");
}
public static void main(String[] args) {
hello(new Process() {
@Override
public void run() {
int randomValue = new Random().nextInt(6) + 1;
System.out.println("주사위 = " + randomValue);
}
});
hello(new Process() {
@Override
public void run() {
for (int i = 1; i <= 3; i++) {
System.out.println("i = " + i);
}
}
});
}
}
|
람다: 메서드(더 정확히는 함수)를 인수로 전달한다.
1
2
3
4
5
6
7
8
9
10
11
12
13
14
15
16
17
18
19
20
21
22
23
24
25
26
27
| public interface Process {
void run();
}
public class Ex4Main {
public static void hello(Process process) {
System.out.println("프로그램 시작");
process.run();
System.out.println("프로그램 종료");
}
public static void main(String[] args) {
hello(() -> {
int randomValue = new Random().nextInt(6) + 1;
System.out.println("주사위 = " + randomValue);
});
hello(() -> {
for (int i = 1; i <= 3; i++) {
System.out.println("i = " + i);
}
});
}
}
|
람다 표현식은 함수형 인터페이스에만 사용된다.
함수형 인터페이스: 하나의 추상 메소드를 가지는 인터페이스.
즉, 메소드를 2개 이상 가진 인터페이스는 람다로 표현할 수 없다.
내부 클래스 활용
1
2
3
4
5
6
7
8
9
10
11
12
13
14
15
16
17
18
19
20
21
22
23
24
25
26
27
28
29
30
31
32
33
34
35
36
37
38
39
40
41
42
43
44
45
46
47
48
49
50
| public class LibraryMain {
public static void main(String[] args) {
Library library = new Library(4); // 최대 4권의 도서를 저장할 수 있는 도서관 생성
library.addBook("책1", "저자1");
library.addBook("책2", "저자2");
library.addBook("책3", "저자3");
library.addBook("자바 ORM 표준 JPA 프로그래밍", "김영한");
library.addBook("OneMoreThing", "잡스");
library.showBooks(); // 도서관의 모든 도서 정보 출력
}
}
public class Library {
private Book[] books;
private int bookCount;
Library(int num) {
books = new Book[num];
bookCount = 0;
}
private class Book {
private String title;
private String author;
public Book(String title, String author) {
this.title = title;
this.author = author;
}
}
public void addBook(String title, String author) {
if (bookCount < books.length) {
books[bookCount++] = new Book(title, author);
} else {
System.out.println("도서관 저장 공간이 부족합니다.");
}
}
public void showBooks() {
System.out.println("== 책 목록 출력 ==");
Arrays.stream(books).forEach(v -> {
if (v != null) {
System.out.println("도서 제목: " + v.title + ", 저자: " + v.author);
}
});
}
}
|
중첩클래스 정리
- 정적 중첩 클래스
- 클래스 내부에 static이 붙은 클래스.
- 바깥 클래스오 밀접한 관련이 있지만, 인스턴스 간에 데이터 공유가 필요 없을 때 사용한다.
- 내부 클래스
- 클래스 내부에 클래스.
- 바깥 클래스와 인스턴스와 연결되어 있고, 바깥 클래스의 인스턴스 상태에 의존하거나 강하게 연관된 작업을 수행할 때 사용한다.
- 지역 클래스
- 클래스 내부 메소드 내 클래스.
- 지역 변수에 접근 가능. 접근하는 지역변수는 final / 사실상 final 이어야 한다.
- 익명클래스
- (메인메소드에서) 클래스를 생성과 동시에 선언.
- 상위 타입을 상속 또는 구현하면서 바로 생성한다.
- 주로 특정 상위 타입을 간단히 구현해서 일회성으로 사용할 때 유용하다.
예외처리
- 자바는 GC가 있기에 JVM 메모리에 있는 인스턴스는 자동으로 해제된다.
- 하지만 외부 연결과 같은 자바 외부의 자원은 자동으로 해제가 되지 않는다.
- 따라서 외부 자원을 사용한 후에는 연결을 해제해서
외부 자원을 반드시 반납해야 한다.
예외처리하는 이유: 프로그램의 안정성과 신뢰성을 높여주는 중요한 역할을 한다.
- 예외 계층 도식화
![]()
Object
- Throwable
- Exception
- SQL Exception
- IO Exception
- Runtime Exception
- NullPointoer Exception
- IllegalArgument Exception
- Error
Object: 자바에서 기본형을 제외한 모든 것은 객체다. 예외도 객체이다.
Throwable: 최상위 예외이다.
Error: 메모리 부족이나 심각한 시스템 오류와 같이 애플리케이션에서 복구가 불가능한 시스템 예외이다. 애플리케이션 개발자는 이 예외를 잡으려고 하면 안된다.
Exception과 그 하위 예외(RuntimeException)는 모두 컴파일러가 체크하는 예외이다.
체크 예외 vs 언체크 예외(런타임 예외)
체크 예외: 발생한 예외를 개발자가 명시적으로 처리해야 한다. 그렇지 않으면 컴파일 오류가 발생한다.
언체크 예외: 개발자가 발생한 예외를 명시적으로 처리하지 않아도 된다.- 주의
상속 관계에서 부모 타입은 자식을 담을 수 있고 이 개념은 예외 처리에도 적용이 된다. 상위 예외를 catch로 잡으면 그 하위 예외까지 함께 잡는다. 따라서 Throwable 예외를 잡으면 Error 예외도 함께 잡히기 때문에 애플리케이션 로직은 이런 이유로 Exception부터 필요한 예외로 생각하고 잡으면 된다. - 예외 기본 규칙
- 예외는 잡아서 처리하거나 밖으로 던저야 한다.
- 예외를 잡거나 던질 때, 지정한 예외뿐만 아니라 하위 예외들도 모두 잡거나 던질 수 있다.
- 예외 처리를 하지 못하고 계속 던지면 어떻게 될까?
자바 main() 밖으로 예외를 던지면 예외 로그를 출력하면서 시스템이 종료된다.
체크 예외
- 체크 예외는 잡아서 처리하거나 밖으로 던지도록 개발자가 직접 명시적으로 처리해야한다. 그렇지 않을 경우 컴파일 오류가 발생한다.
체크 예외
1
2
3
4
5
6
7
8
9
10
11
12
13
14
15
16
17
18
19
20
21
22
23
24
25
26
27
28
29
30
31
32
33
34
35
36
37
38
39
40
41
42
43
44
45
46
47
48
49
50
51
52
53
54
55
56
57
58
59
60
61
62
63
64
65
| /**
MyCheckedException 클래스의 생성자는 Exception 클래스의 생성자를 오버로딩한다.
자식 클래스에서 부모 클래스의 생성자를 호출하여 부모 클래스의 필드나 메소드를 초기화한다.
부모 Exception 클래스에 메세지를 보관
-> Throwable Class 내 String detailMessage 필드에 메시지 저장.
-> getMessage()를 통해 조회 가능.
**/
public class MyCheckedException extends Exception {
public MyCheckedException(String message) {
super(message);
}
}
// ---------------------------------------
public void call() throws MyCheckedException {
throw new MyCheckedException("exception message");
}
// ---------------------------------------
public class Service {
Client client = new Client();
// 체크 예외를 잡아서 처리하는 코드
public void callCatch() {
try {
client.call();
} catch (MyCheckedException ex) {
// 예외 처리 로직
System.out.println("예외 처리, message= " + ex.getMessage());
}
System.out.println("catch 문에서 예외 처리 후 정상흐름으로 돌아온다.");
}
// 체크 예외를 밖으로 던지는 코드
public void callThrow() throws MyCheckedException {
client.call();
}
}
// ---------------------------------------
public class CheckedExceptionCatchMain {
public static void main(String[] args) {
Service service = new Service();
service.callCatch();
System.out.println("정상 종료");
}
}
// ---------------------------------------
public class CheckedExceptionThrowMain {
public static void main(String[] args) throws MyCheckedException {
Service service = new Service();
service.callThrow(); // 컴파일 오류.
System.out.println("정상 종료"); // 출력 x
}
}
|
예외 클래스를 만들려면 예외 클래스를 상속 받으면 된다. Exception 을 상속받은 예외는 체크 예외가 된다.
예외가 밖으로 던져지면 예외 정보와 Stack Trace 를 출력하고 프로그램이 종료된다.
StackTrace: 예외가 어디서 발생했는지, 어떤 경로를 거쳐서 넘어왔는지 확인할 수 있다.
언체크 예외
RuntimeException과 그 하위 예외는 언체크 예외로 분류된다.컴파일러가 예외를 체크하지 않는다.- 체크 예외 vs 언체크 예외
- 체크 예외: 예외를 던질 시 항상 throws 키워드를 사용해서 던지는 예외를 선언해야 한다.
- 언체크 예외: 예외를 던질 시 throws 키워드 생략이 가능하다. 생략할 경우, 자동으로 예외를 던진다.
예외 처리 도입
예외처리 도입 코드
1
2
3
4
5
6
7
8
9
10
11
12
13
14
15
16
17
18
19
20
21
22
23
24
25
26
27
28
29
30
31
32
33
34
35
36
37
38
39
40
41
42
43
44
45
46
47
48
49
50
51
52
53
54
55
56
57
58
59
60
61
62
63
64
65
66
67
68
69
70
71
72
73
74
75
76
77
78
79
80
81
82
83
84
85
86
87
88
89
90
91
92
93
94
95
96
97
98
99
100
101
102
103
104
105
106
107
108
109
110
111
112
| // CheckedException
public class NetworkClientExceptionV2 extends Exception {
private String errorCode;
public NetworkClientExceptionV2(String errorCode, String message) {
super(message);
this.errorCode = errorCode;
}
public String getErrorCode() {
return errorCode;
}
}
// ---------------------------------------
public class NetworkClientV2 {
private String address;
public boolean connectError;
public boolean sendError;
public NetworkClientV2(String address) {
this.address = address;
}
public void connect() throws NetworkClientExceptionV2{
if (connectError) {
throw new NetworkClientExceptionV2("connectError", address+ " 서버 연결 실패");
}
System.out.println(address + " 서버 연결 성공");
}
public void send(String data) throws NetworkClientExceptionV2{
if (sendError) {
throw new NetworkClientExceptionV2("sendError", address + " 서버에 데이터 전송 실패: " + data);
// 중간에 NetworkClientExceptionV2 예외가 아닌 다른 예외가 발생했다 가정할 때,
// throw new RuntimeException("RuntimeException Message");
}
System.out.println(address + " 서버에 데이터 전송: " + data);
}
public void disconnect() {
System.out.println(address + " 서버 연결 해제");
}
public void initError(String data) {
if (data.contains("error1")) {
connectError = true;
}
if (data.contains("error2")) {
sendError = true;
}
}
}
// ---------------------------------------
public class NetworkServiceV2_5 {
public void sendMessage(String data) {
String address = "https://example.com";
NetworkClientV2 client = new NetworkClientV2(address);
client.initError(data);
try {
client.connect();
client.send(data);
} catch (NetworkClientExceptionV2 e) {
System.out.println("[오류] 코드: + " + e.getErrorCode() + ", 메시지 : " + e.getMessage());
} finally {
client.disconnect();
}
// client.disconnect();
}
}
// ---------------------------------------
public class MainV2 {
public static void main(String[] args) throws NetworkClientExceptionV2 {
NetworkServiceV2_5 service = new NetworkServiceV2_5();
Scanner scanner = new Scanner(System.in);
while (true) {
System.out.println("전송할 문자: ");
String input = scanner.nextLine();
if (input.equals("exit")) {
break;
}
service.sendMessage(input);
System.out.println();
}
System.out.println("프로그램을 종료합니다.");
}
}
|
finally 없이 client.disconnect(); 호출 시, 정상흐름이든 예외처리 후 흐름이든 항상 disconnect()이 호출된다. 하지만 catch 에서 놓치는 오류( RuntimeException 등.. ) 발생 시, 하위 client.disconnect() 는 호출되지 못한다.
예외 계층
예외를 단순히 오류 코드로 분류하는 것이 아니라 예외를 계층화해서 다양하게 만들면 더 세밀하게 예외를 처리할 수 있다.
예외를 계층화하고 다양하게 만들면 더 세밀한 동작들을 깔끔하게 처리할 수 있다. 그리고 특정 분류의 공통 예외들도 한번에 catch로 잡아서 처리할 수 있다.
실무 예외 처리
- 체크 예외를 사용할 때 발생하는 문제
- 처리할 수 없는 예외: 예외를 잡아서 복구할 수 있는 예외보다 복구할 수 없는 예외가 더 많다.
- 체크 예외의 부담: 처리할 수 없는 예외는 밖으로 던져야 한다. 체크 예외이므로 throws 에 던질 대상을 일일이 명시해야 한다.
- 예외 공통 처리
이렇게 처리할 수 없는 예외들은 중간에 여러곳에서 나누어 처리하기 보다는 예외를 공통으로 처리할 수 있는 곳을 만들어서 한 곳에서 해결하면 된다. 어차피 해결할 수 없는 예외들이기 때문에 이런 경우 고객에게는 현재 시스템에 문제가 있습니다. 라고 오류 메시지를 보여주고, 만약 웹이라면 오류 페이지를 보여주면 된다. 그리고 내부 개발자가 지금의 문제 상황을 빠르게 인지할 수 있도록, 오류에 대한 로그를 남겨두면 된다. 이런 부분은 공통 처리가 가능하다.
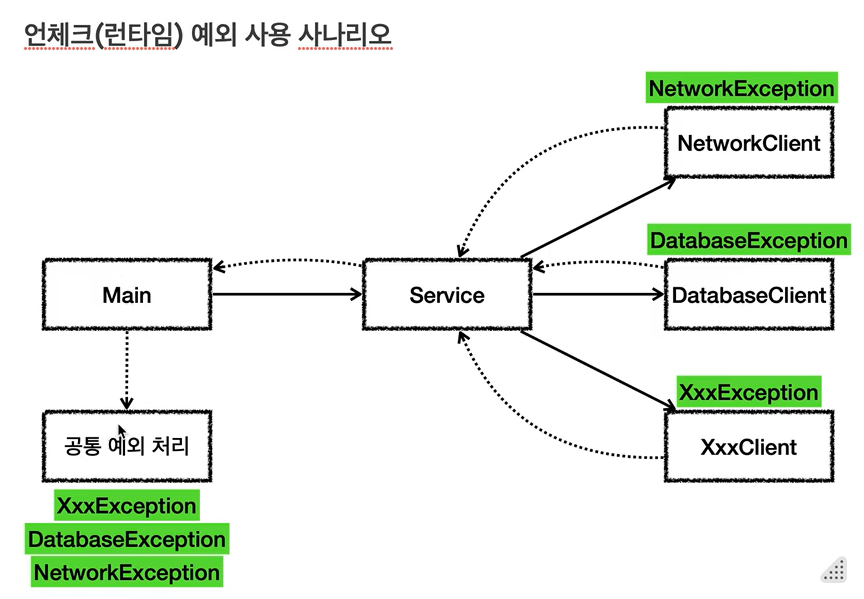
실무 예외 처리 방안
중요한 예외는 언체크(RuntimeException) 예외로 만들고, 해결할 수 없는 예외들은 공통으로 처리한다.
![]()
Service 에서도 예외를 던져고 메인에서 공통 예외 처리를 한다.
공통 예외 처리
1
2
3
4
5
6
7
8
9
10
11
12
13
14
15
16
17
18
19
20
21
22
23
24
25
26
27
28
29
30
31
32
33
34
35
36
37
38
39
40
41
42
43
44
45
46
47
48
49
50
51
52
53
54
55
56
57
58
59
60
61
62
63
64
65
66
67
68
69
70
71
72
73
74
75
76
77
78
79
80
81
82
83
84
85
86
87
88
89
90
91
92
93
94
95
96
97
98
99
100
101
102
103
104
105
106
107
108
109
110
111
112
113
114
115
116
117
118
119
120
121
122
123
124
125
126
127
128
129
130
131
132
133
134
135
136
137
138
139
140
141
142
143
144
145
146
147
148
149
150
151
152
153
154
155
156
157
158
159
160
161
162
163
164
165
166
167
168
169
170
171
|
// ================== Exception ==================
public class NetworkClientExceptionV4 extends RuntimeException {
public NetworkClientExceptionV4(String message) {
super(message);
}
}
public class ConnectExceptionV4 extends NetworkClientExceptionV4 {
// 서버의 주소를 넣어둔다.
private final String address;
public ConnectExceptionV4(String address, String message) {
super(message);
this.address = address;
}
public String getAddress() {
return address;
}
}
public class SendExceptionV4 extends NetworkClientExceptionV4 {
private final String sendData;
public SendExceptionV4(String sendData, String message) {
super(message);
this.sendData = sendData;
}
public String getSendData() {
return sendData;
}
}
// ================== object ==================
public class NetworkClientV4 {
private String address;
public boolean connectError;
public boolean sendError;
public NetworkClientV4(String address) {
this.address = address;
}
public void connect(){
if (connectError) {
// UnChecked(RuntimeException) 이므로 throws 할 필요없다.
throw new ConnectExceptionV4(address, " 서버 연결 실패");
}
System.out.println(address + " 서버 연결 성공");
}
public void send(String data) {
if (sendError) {
// UnChecked(RuntimeException) 이므로 throws 할 필요없다.
throw new SendExceptionV4(data, address+ " 서버에 데이터 전송 실패: "+ data);
}
System.out.println(address + " 서버에 데이터 전송: " + data);
}
public void disconnect() {
System.out.println(address + " 서버 연결 해제");
}
public void initError(String data) {
if (data.contains("error1")) {
connectError = true;
}
if (data.contains("error2")) {
sendError = true;
}
}
}
// ================== service ==================
public class NetworkServiceV4 {
public void sendMessage(String data) {
String address = "https://example.com";
NetworkClientV4 client = new NetworkClientV4(address);
client.initError(data);
try {
client.connect();
client.send(data);
} finally {
client.disconnect();
}
/**
* 언체크 예외이므로 throws 를 사용하지 않는다.
* NetworkClientV4 예외들은 복구할 수 없으며 해당 예외들을 생각하지 않는 것이 더 나은 선택일 수 있다.
*
* => 해결할 수 없는 예외들은 다른 곳에서 공통으로 처리된다.
* 이런 방식 덕 분에 NetworkServiceV4 는 해결할 수 없는 예외보다는 본인 스스로의 코드에 더 집중할 수 있으며, 코드가 깔끔해진다.
*/
}
}
// ================== main ==================
public class MainV4 {
public static void main(String[] args) {
NetworkServiceV4 service = new NetworkServiceV4();
Scanner scanner = new Scanner(System.in);
while (true) {
System.out.println("전송할 문자: ");
String input = scanner.nextLine();
if (input.equals("exit")) {
break;
}
try {
service.sendMessage(input);
} catch (Exception e) {
exceptionHandler(e);
}
System.out.println();
}
System.out.println("프로그램을 종료합니다.");
}
// 공통 예외 처리
private static void exceptionHandler(Exception e) {
// 공통 처리
System.out.println("사용자 메시지: 죄송합니다. 알 수 없는 문제가 발생했습니다."); // 사용자용: html 에 출력된다 가정
System.out.println("==개발자용 디버깅 메시지=="); // 개발자용: 파일로 남겨지는 내용으로 가정
e.printStackTrace(System.out); // 스택 트레이스 출력
// e.printStackTrace(System.err);
// 필요하면 예외 별로 별도의 추가 처리 가능
if (e instanceof SendExceptionV4 sendEx) {
System.out.println("[전송 오류] 전송 데이터: "+ sendEx.getSendData());
}
}
/**
* e.printStackTrace(System.out); vs e.printStackTrace(System.err); || e.printStackTrace();
* out 과 err 의 흐름이 달라서 출력 순서가 달라질 수 있음. (코드 실행 시 의도된 순서대로 콘솔에 찍히게 하기 위해 System.out 사용)
* 일반적으로 e.printStackTrace() 쓰면 됨.
*
* 실무에서는 Slf4J, logback 같은 별도의 로그 라이브러리를 사용해서 콘솔과 특정 파일에 함께 결과를 출력한다.
* 그런데, e.printStackTrace() 를 직접 호출하면 결과가 콘솔에만 출력되어 서버에서 로그를 확인하기 어렵다.
*/
}
|
try with resources
- try with resources
- AutoClosable 인터페이스를 구현한 객체
- close() 메소드 오버라이딩. try문 종료 시 호출할 메소드를 추가한다.
- try 문 안 괄호 내 서비스에서 해당 객체 인스턴스 생성
- try with resources 장점
- 리소스 누수 방지: 모든 리소스가 제대로 닫히도록 보장한다.
- 코드 간결성 및 가독성 향상: 명시적인 close() 호출이 필요없어 코드가 더 간결하다.
- 조금 더 빠른 자원 해제: try -> catch -> finally 로 catch 이후에 자원을 반납하는 대신, try with resources 구문은 try 블럭이 끝나는 즉시 close() 메소드를 호출한다.
try with resources 코드
1
2
3
4
5
6
7
8
9
10
11
12
13
14
15
16
17
18
19
20
21
22
23
24
25
26
27
28
29
30
31
32
33
34
35
36
37
38
39
40
41
42
43
44
45
46
47
48
49
50
51
52
53
54
55
56
57
58
59
60
61
62
63
64
65
66
67
68
69
70
71
72
73
74
75
76
77
78
79
80
81
82
83
84
85
86
87
88
89
90
91
92
93
94
95
96
97
98
99
100
101
102
103
104
105
106
107
108
109
110
111
112
113
114
115
116
117
118
119
120
121
122
|
// =================== object ===================
public class NetworkClientV5 implements AutoCloseable {
private String address;
public boolean connectError;
public boolean sendError;
public NetworkClientV5(String address) {
this.address = address;
}
public void connect(){
if (connectError) {
// UnChecked(RuntimeException) 이므로 throws 할 필요없다.
throw new ConnectExceptionV4(address, " 서버 연결 실패");
}
System.out.println(address + " 서버 연결 성공");
}
public void send(String data) {
if (sendError) {
// UnChecked(RuntimeException) 이므로 throws 할 필요없다.
throw new SendExceptionV4(data, address+ " 서버에 데이터 전송 실패: "+ data);
}
System.out.println(address + " 서버에 데이터 전송: " + data);
}
public void disconnect() {
System.out.println(address + " 서버 연결 해제");
}
public void initError(String data) {
if (data.contains("error1")) {
connectError = true;
}
if (data.contains("error2")) {
sendError = true;
}
}
/**
* AutoCloseable 인터페이스를 구현하여 메소드 오버라이딩.
* try 문에서 벗어날 시 바로 close() 메소드가 호출된다.
*/
@Override
public void close() {
this.disconnect();
}
}
// =================== serevice ===================
public class NetworkServiceV5 {
public void sendMessage(String data) {
String address = "https://example.com";
try (NetworkClientV5 client = new NetworkClientV5(address)) {
client.initError(data);
client.connect();
client.send(data);
}
}
}
// =================== main ===================
public class MainV5 {
public static void main(String[] args) {
NetworkServiceV5 service = new NetworkServiceV5();
Scanner scanner = new Scanner(System.in);
while (true) {
System.out.println("전송할 문자: ");
String input = scanner.nextLine();
if (input.equals("exit")) {
break;
}
try {
service.sendMessage(input);
} catch (Exception e) {
exceptionHandler(e);
}
System.out.println();
}
System.out.println("프로그램을 종료합니다.");
}
// 공통 예외 처리
private static void exceptionHandler(Exception e) {
// 공통 처리
System.out.println("사용자 메시지: 죄송합니다. 알 수 없는 문제가 발생했습니다."); // 사용자용: html 에 출력된다 가정
System.out.println("==개발자용 디버깅 메시지=="); // 개발자용: 파일로 남겨지는 내용으로 가정
e.printStackTrace(System.out); // 스택 트레이스 출력
// e.printStackTrace(System.err);
// 필요하면 예외 별로 별도의 추가 처리 가능
if (e instanceof SendExceptionV4 sendEx) {
System.out.println("[전송 오류] 전송 데이터: "+ sendEx.getSendData());
}
}
}
|